Showing posts with label maya. Show all posts
Showing posts with label maya. Show all posts
Thursday, 28 September 2017
Thursday, 21 September 2017
Maya Python and MEL Script Reel
These are few custom scripts to speed up my work and the techniques behind my rigs.
Downloads:-
skintransferbetweentwojnt-for-maya
re-connect-corresponding-attribute-for-maya

Thanks! Please share, comment and subscribe by email for updates and to be in touch!
Wednesday, 13 September 2017
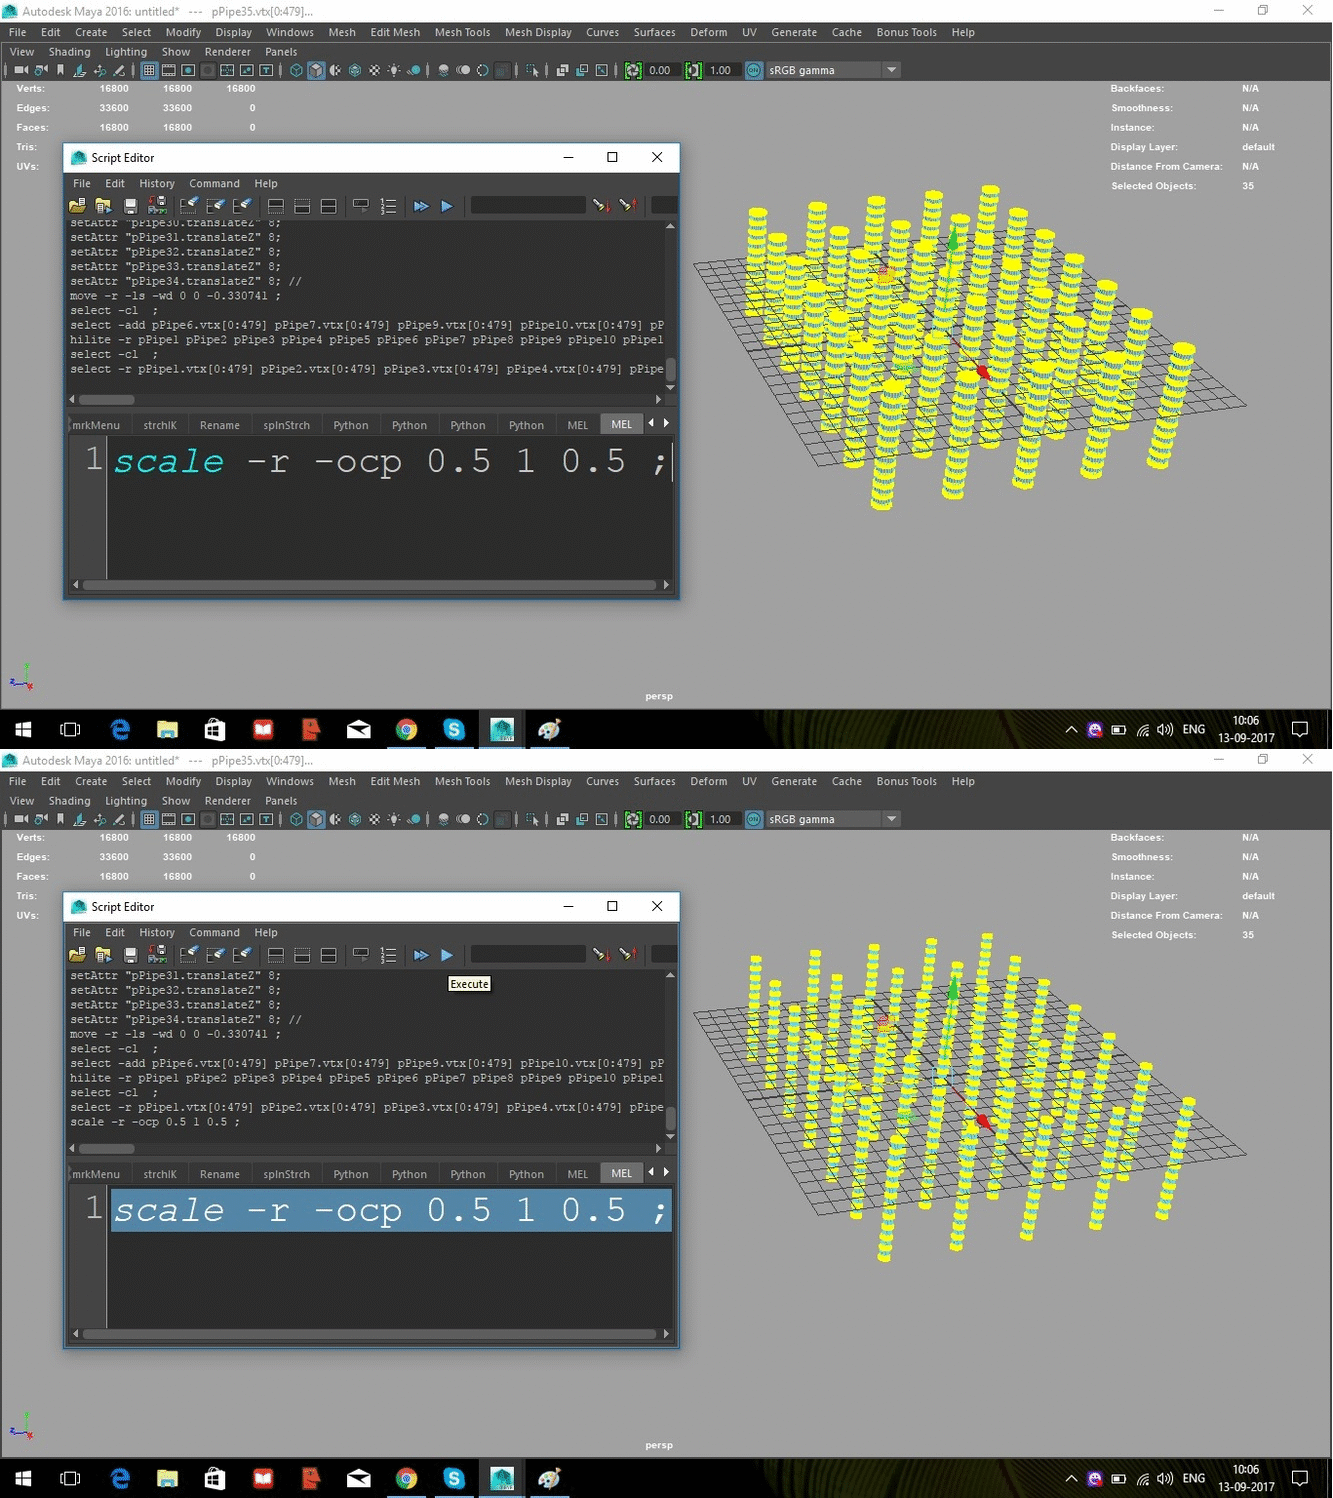
Reducing Mesh Thickness in Maya
Adjusting mesh thickness of hair strands in Maya.
Select the Mesh in component mode. Execute " scale -r -ocp 0.5 1 0.5 ; " as MEL.
the components are scaled with object center pivot according to the x y z values.
Thanks! Please share, comment and subscribe by email for updates and to be in touch!
Tuesday, 5 September 2017
Maya FBX Export Of Set Driven Keys Animation
Maya FBX Export Of Set Driven Keys
Export setdriven key animation are considered complex animation and will be exported as baked animation. Here is the work about to do the same.
First load FBX Export Plugin :

In File> Export Selection Options under "File Type Specific Options" Click "Edit presets..."
In Edit export preset> EXPORT>Include>check on "Bake Animation" .
In Edit export preset> EXPORT>Include>check on "Bake Animation" .

Thanks! Please share, comment and subscribe by email for updates and to be in touch!
Maya Facial Ctrl Creation
Maya Facial Ctrl Creation Work Flow
This blog is to setup the facial ctrl follow the face mesh deformation
Have the facial joints created and grouped to itself to preserve the transforms, so the joint will have zeroed out transform values; then place it on the required area viz cheek or lip. by holding the group of the joint.
Have the ctrl created for the joint according to its orientation. Have top group that holds the transform value and the ctrl will have zeroed out transform value. Group the ctrl once again to have zeroed out intermediate transform node, which will be connected to a multiplyDivide node with iput 2X 2Y 2Z all set to "-1"
Do the connections as below and do the skinning too and see the output or it will look weird.

Thanks! Please share, comment and subscribe by email for updates and to be in touch!
Sunday, 3 September 2017
Maya Transfer Skin Weight between Joints
Maya Transfer Skin Weight between Joints
Maya native skin tool can be used to transfer skinWeight or swap skinWeight between two joints indeed.
Lets see how to go about it.

Here three joints are bound to a mesh. The skinkWeight of the verts influenced by the Bottom joint is transferred to the Top joint.
For this you have to be in "Paint Select" mode on the "paint skin weight tool", Right click on the Bottom joint to select the verts influenced by it and then select the Top joint and crank the value to 1.
Or
Be in Paint mode it self and Right click on the Bottom joint to select the verts influenced by it and then ctrl click to select the Top joint and click the icon marked in the image below.

I have automated the stuff which you can download.
Thanks! Please share, comment and subscribe by email for updates and to be in touch!
Or
Be in Paint mode it self and Right click on the Bottom joint to select the verts influenced by it and then ctrl click to select the Top joint and click the icon marked in the image below.

I have automated the stuff which you can download.
Thanks! Please share, comment and subscribe by email for updates and to be in touch!
Friday, 14 July 2017
Maya Add Influence to skinCluster
Maya Add Influence to skinCluster
This option helps to add a missed out joint or geometry as an influence to the skinCuster.
Follow the option to add a new joint without disturbing the paint weight of the skinCluster.

A curve or a Non-uniform rational basis spline (NURBS) can also be added as influence object and weights can be added but the skinCluster should have "Use components" On. This can be used for facial skin weight rigs like using a wire deformer. Wire deformer holds the volume but this will have linear deformation.


Thanks! Please share, comment and subscribe by email for updates and to be in touch!
Thursday, 6 July 2017
Maya Shelf Button
Maya Shelf Button to do two operation.
One can echo the command of an operation in script editor and pull it to the shelf. The same button can be used to execute the opposite of the same operation by double clicking or what ever one feel like.

Thanks! Please share, comment and subscribe by email for updates and stay in touch!
Tuesday, 4 July 2017
Maya Blend Smooth Skinning Method
Maya Dual Quaternion Paint Weight
The areas painted with DQ weight helps in preserving the volume on knees, elbow, knuckle, etc. overriding the classic linear skin values.
Give a value of 0.2 DQ weight to the whole body, will help as a whole with good deformation.

Paint the rigid area, where volume has to be maintained with greater value of DQ weight.

Note: stretchy set up of the rig has to be on translate of the aim axis and not on the scale to avoid weird deformation.
Thanks! Please share, comment and subscribe by email for updates and stay in touch!
Thanks! Please share, comment and subscribe by email for updates and stay in touch!
Wednesday, 28 June 2017


Tuesday, 27 June 2017
Maya Custom Marking Menu
Maya Custom Marking Menu through a Designer

Maya has its default marking menu which is mostly for polygon/curve edits. Here is the Designer to be downloaded and put in ones own commands.
Enjoy!
Friday, 23 June 2017
Making Maya Scene Lite
Making Maya Scene Lite.
#isHistoryIntrest
This command switch off the history on the geometry (that is having any deformer) and makes the scene file lite.
#isHistoryIntrest
import maya.cmds as cmds
mesh = cmds.ls(sl=1)
for geo in mesh:
{cmds.setAttr(geo+'.ihi',0) for geo in cmds.ls()}

However, while switching on the history brings out hidden groupId and Groupparts of the corresponding deformers.
#isHistoryIntrest
import maya.cmds as cmds
mesh = cmds.ls(sl=1)
for geo in mesh:
{cmds.setAttr(geo+'.ihi',1) for geo in cmds.ls()}
To see the result, the geometry should be de-selected and selected again.
Selecting a single geometry to hide the 'HistoryIntrest', results in hidding the history of all the geometry in the scene.
Any thoughts ! Please use the comment area to share.
Thursday, 22 June 2017
Maya Non Flip IK Leg
Non Flip IK Leg
Method 1

Method 2

Thanks! Please share, comment and subscribe by email for updates!
Monday, 19 June 2017
Maya Riggers Shortcuts
Maya Riggers Shortcuts
- Ctrl + space bar : Toggle full and standard screen
- y : Selects the last used tool that is not one of Select, Move,
- Rotate, or Scale
- Shift + S : With left mouse button for Keyframe marking menu
- Ctrl + Skin weight paint brush with Replace, Add and Scale do opp value
- Alt+ b : view-port back ground color
- Alt+LMB Click drag right/left to zoom in/out a region.
- Ctrl + a : toggle between attribute editor n channel box
- with skin weight paint brush right click over the desired joint to select it for painting
- Shift+ paint weight: with skin weight paint brush in replace value shift + paint for smooth weight
- Alt+ h : hide un selected
- Ctrl+Shift +h : show last hidden
- Ctrl + g : Group
- Ctrl+Spacebar : Switch Maya window to full screen
- down arrow : selects shape node of the object
- MMB + d : move the objects pivot
- Use left/right/up/down arrow key to navigate in outliner hierarchy
- Use MMB to switch automatically to Rotate mode for the selected influence while in paint tool
- Tab : To snap multiple object to the transform value of the last selected,click on the translateX and press Tab,......
- Shift +W/E/R :Keys Translate/Rotate/Scale receptively on the timeline.

Add on comments if you have any shortcut key not listed here.
Thanks! Please share, comment and subscribe by email for updates!
Subscribe to:
Posts (Atom)
New Post

-
 Maya Search and Replace Names Many of use do not use the option to remove prefix with native Maya Modify>Search and Replace Option,...
-
 Segment Scale Compensate option in Maya Joint Tool What is Segment Scale Compensate? When this option is checked on in the joint cr...